New updates to the old MQ (2019 updates)
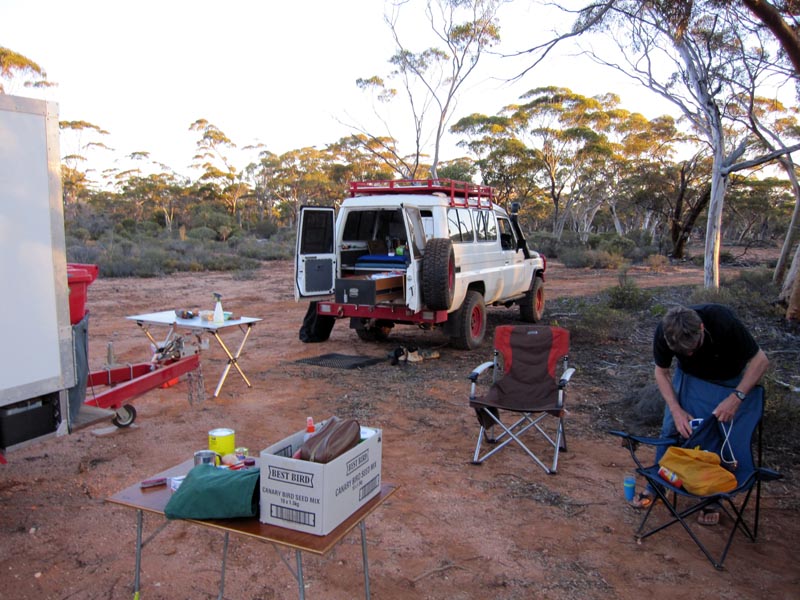
Well, not one to not keep up with technology (when appropriate), it was time to upgrade a few things in the old MQ for the 2011 oz trip.
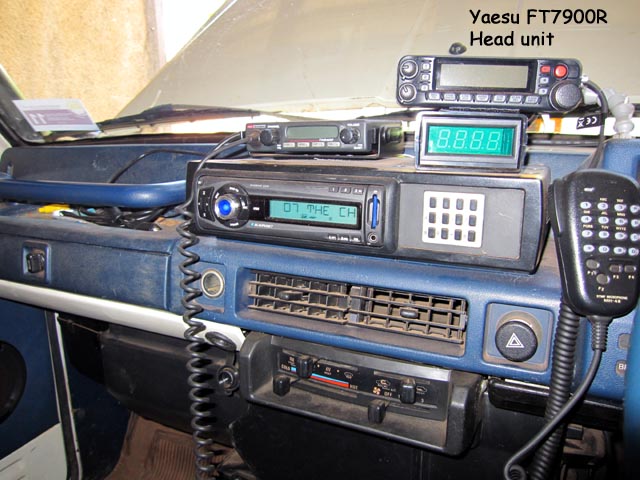
First up was adding a dual band VHF/UHF Ham radio. After some research, the FT7900R seemed a good value for what I wanted which was primarily a 2M rig with a remote face. Bonus was the UHF band.
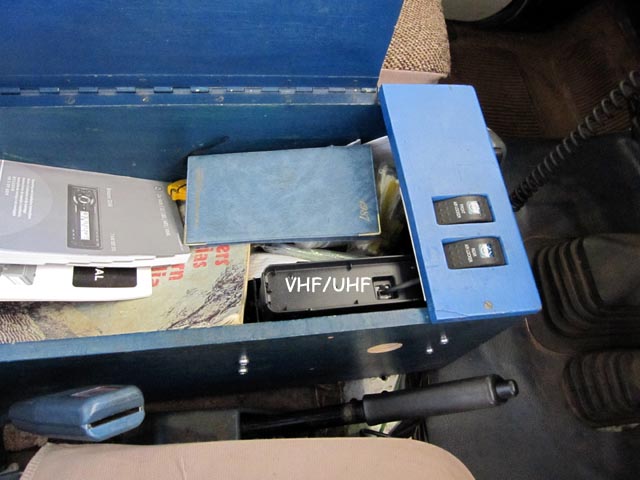
I mounted the rig itself into the center console, since it's well protected and gets it out of the way. I drilled a hole in the side that lines up with the fan in the rig for ventilation. While installing the rig I also added another two 12V outlets in the front/bottom area of the console. Can't have enough 12V outlets :)
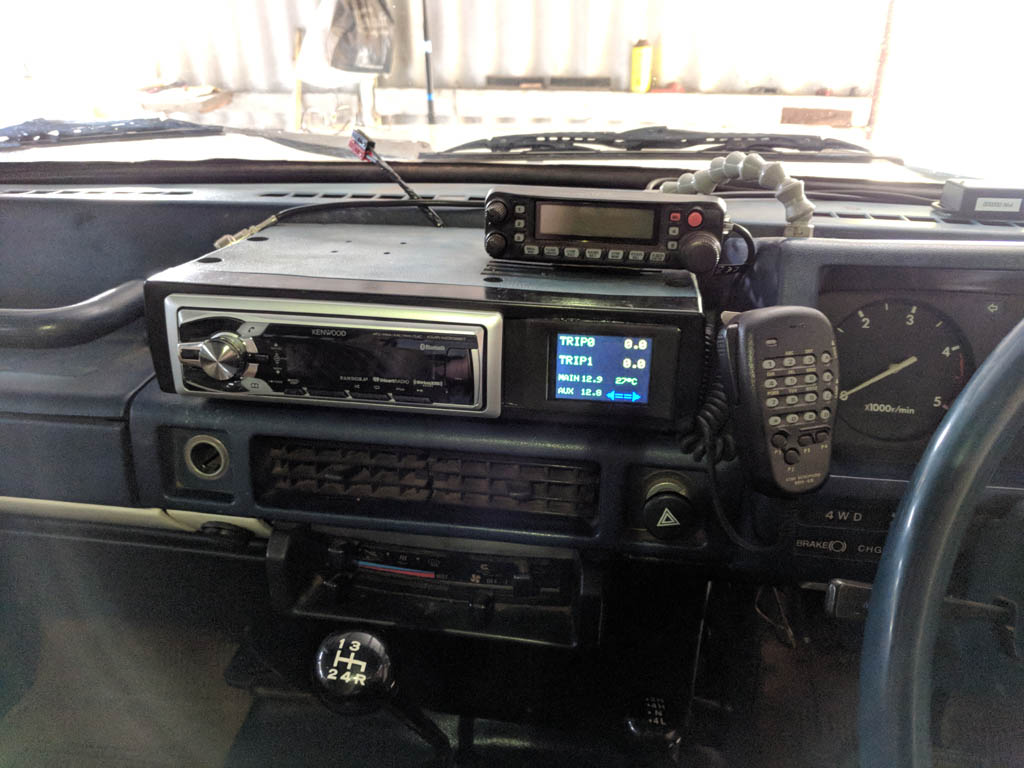
The next picture shows the dash as of 2011. The remote face/head unit for the FT7900R mounts via some locline and a strip of velcro secures it to the top of my trip computer. Works great, doesn't rattle, doesn't block forward visibility while still being easy to see/access. The microphone is mounted via its clip that is screwed into the instrument cluster pod. I mounted a Larsen 70SH up on the roof rack, the NMO connector is protected by one of the cross members of the rack. The antenna has a spring base to allow it to take hits from low hanging branches/scrub and the antenna itself is a stainless steel center loaded whip that covers 2m/440MHz.
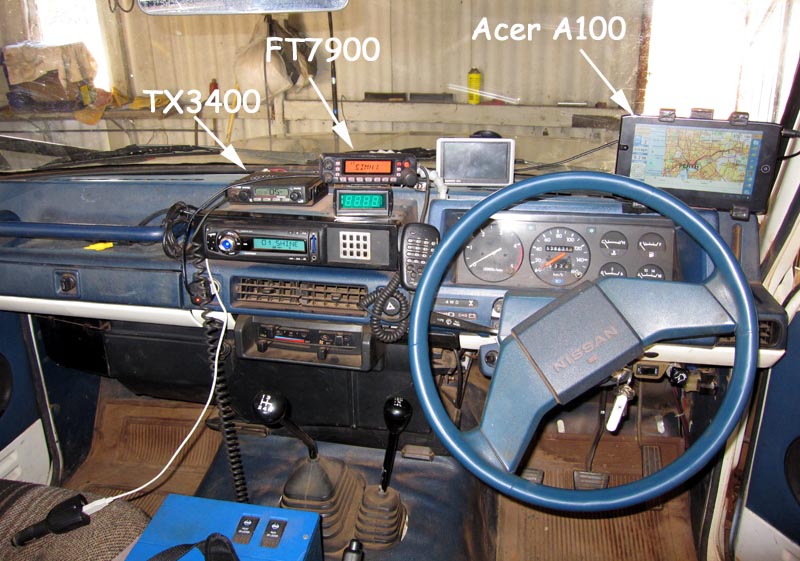
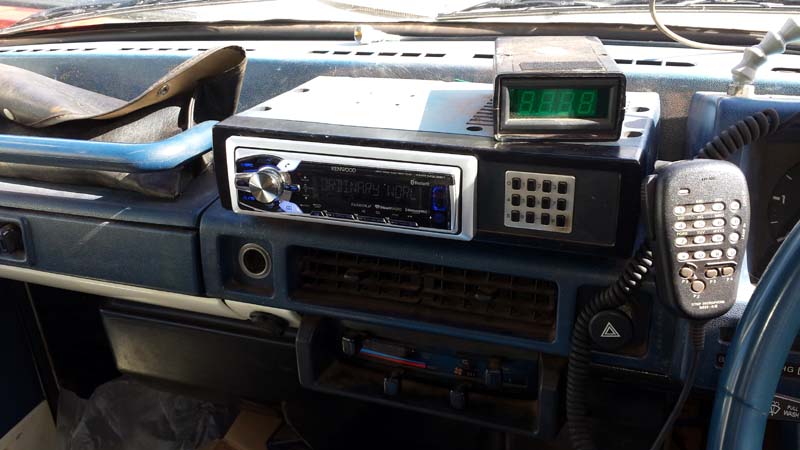
For this trip I also replaced the old tape deck with a digital only deck. It's a cheap Blaupunkt that has SD and USB for music and also an Ipod cable. No more cassettes to rattle around. I never had a CD player since with corrugations and dust it seemed likely to fail quickly. With solid state only media I now have LOTs of music choices and all fits neatly on SD or USB flash. Bonus is getting rid of a lot of cassettes in the center console and freeing up more room for other toys instead... Well during the 2014 trip the Blaupunkt gave up the ghost (by emitting a LOT of smoke), so it'll be replaced with a more modern Kenwood KMR-M308BT digital only unit. The Kenwood is compatible with modern Ipod units (latest generation touch etc) and music can be streamed via Bluetooth.
Updated after the 2012 trip. I now run an Acer A100 7" tablet with oziexplorer (android version) as my primary navigation unit. The unit performed flawlessly for the entire trip and having a decent sized display and touch screen GPS system was wonderful. Much nicer than the older WinCE PDA or having to use a laptop. I have various maps available on the A100 including a few different Natmap 250k topos, the Geological 250k series and some of the Hema stuff. I can also run a cached version of Google Earth (for Android) so I have access to decent aerial or satellite imagery with more recent tracks/roads visible. On the 2014 trip the TX3400 failed, it could receive fine, but transmit distance was limited to maybe 100metres, so I'll need to find a more reliable unit - so much for GME 'made in australia' quality... I did swap out the antenna with one of Rod's and still the same problem, so looks like the power amp in the unit has blown, guess it's time to invest in a different brand.
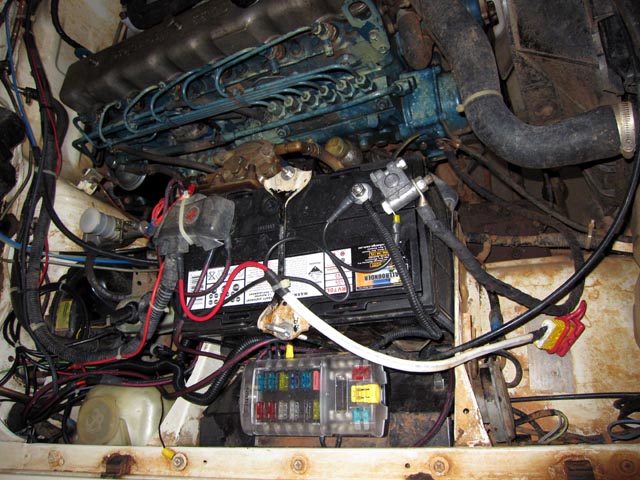
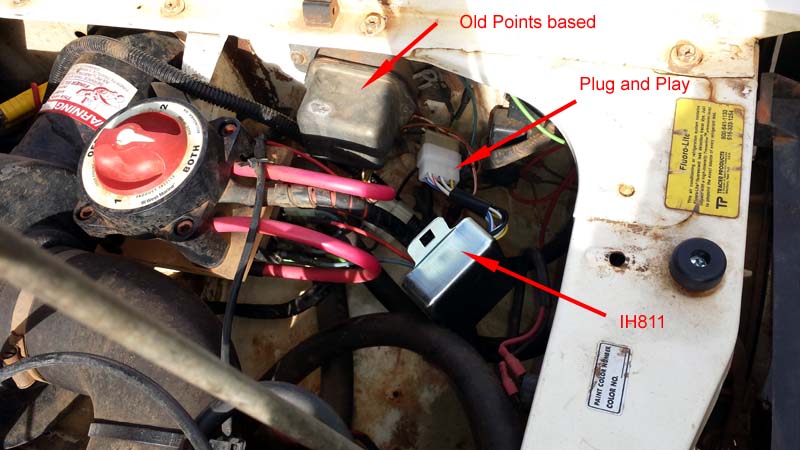
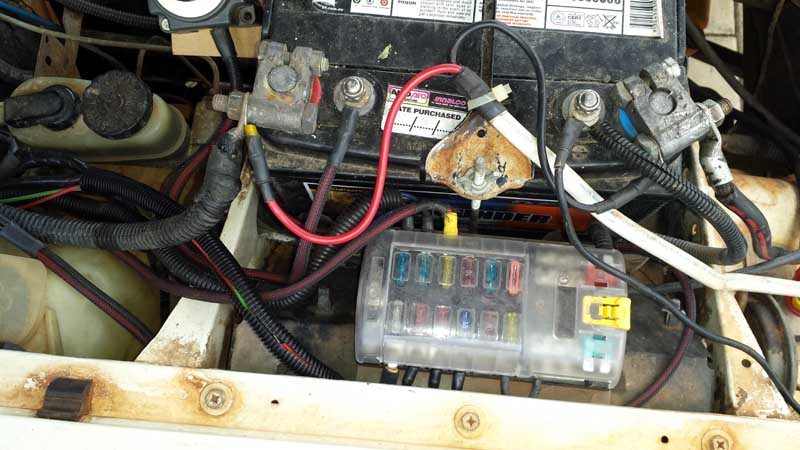
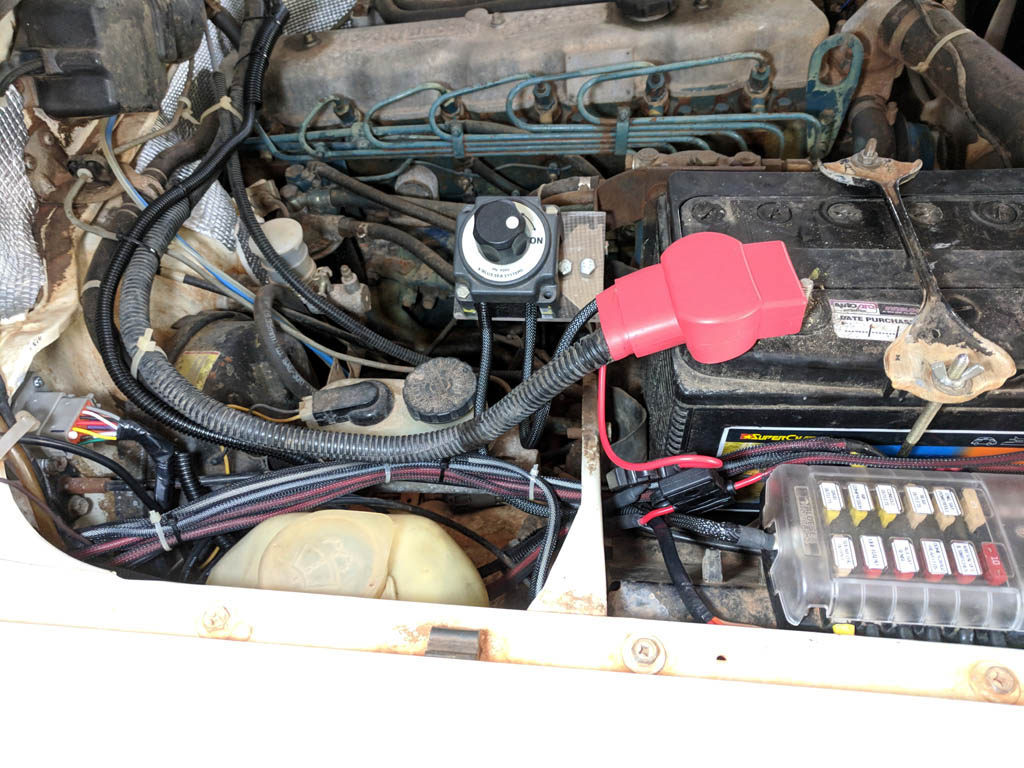
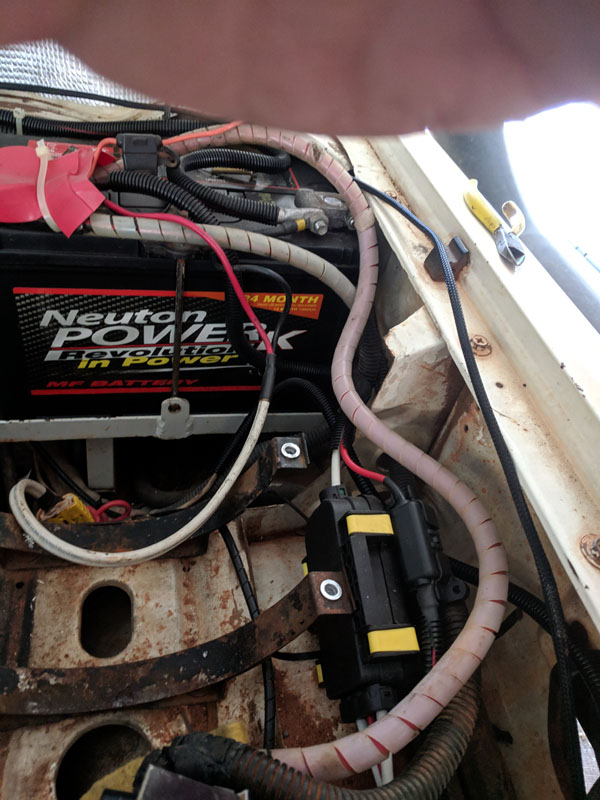
Of course with the new toys, it was time to add more fused outlets to the engine bay. Picked up a very nice fuse panel in the US (Bluesea unit) and installed it connected to the aux battery. Also put in a new dual purpose (deep cycle / starting) battery. Nice feature of these batteries are the extra lugs for lower current draw devices - which covers all the fused items. I "recycled' the original fuse block for the Ham radio, since to be follow Yaesu's recommendations they require dedicated fuses for both the +12 AND Ground feeds for the radio. Also, the radio Ground is run all the way to the fuse and then to the battery.
Anyhow, all done and the Bluesea fuse panel still has a LOT of spare slots for future additional toys. I populated all the fuse slots with various value fuses, so that for now they just become 'spares' that are easily accessible if needed.
The white cable in the picture above is a new 50A capable Anderson outlet (SB50 unit). I added another unit to the main battery as well. I've put Anderson connectors on my second air compressor, on my solar panel and on my 12V drill. Anderson connectors are GREAT! They are colour coded (Yellow is assigned to +12V) and one colour will not insert into another, ensuring safety.
I bought nice red shrouds to keep dirt/muck out of the Anderson connectors. BUT, if water gets in the back, it will sit inside the connector and cause the pins to corrode. I used electrically safe silicone to fill/seal the rear entry of the connector to keep water from getting into the housing. Even though you wouldn't think water could get in, driving through puddles etc can splash enough water up into the engine bay to fill the connectors.
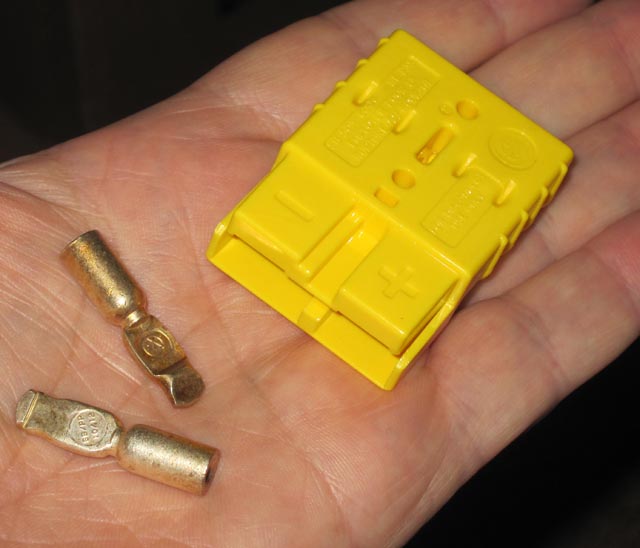
The great thing about the Anderson connectors is that they are hermaphroditic and as such will plug into each other, i.e. you buy one connector and it can act as the male or the female while maintaining correct polarity connection, brilliant!
So, after a bunch of years of driving through scrub and low hanging trees/branches etc, the food & fuel boxes were showing some signs of wear and tear. The fuel box took a good hit during the 2011 trip - low branch managed to take out a jerry can. Found it on the ground, bit dented, but still fully sealed and not damaged at all from a fuel carrying perspective - tough stuff!
The food box has also had quite a few hits and the leading edge had quite a few chips out of the plywood since the original aluminium angle was on the thin/small side. Figured I'd upgrade to full1" material and 1/8" thick. This will prevent the lid trying to 'rotate' if it gets hit by a branch since the aluminium will help transfer the force to the front edge of the box.
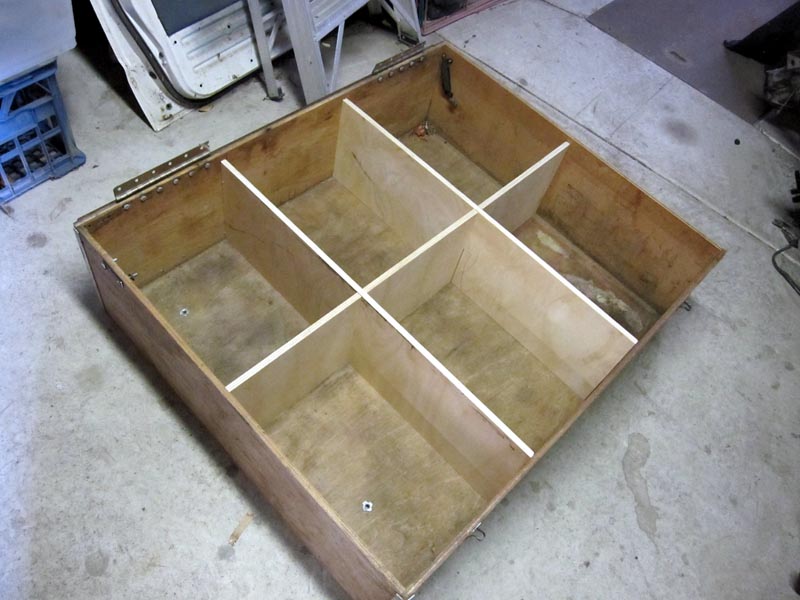
So, here's a picture of the inside of the food box with 6 partitions installed - it's got harder and harder to find cardboard boxes (clamshell banana boxes etc at supermarkets). Rod generously provided his tablesaw and cutting skill to get all the wood cut for me. The partitions are 3 sections of wood that are cut to interlock. I also picked up a section of offcut rubber for use in the back of utes. That will sit on the bottom of the box to a) prevent cans and stuff from rattling and b) allow any water that gets in when it rains to drain out of the box. The box has holes in all 4 corners for drainage.
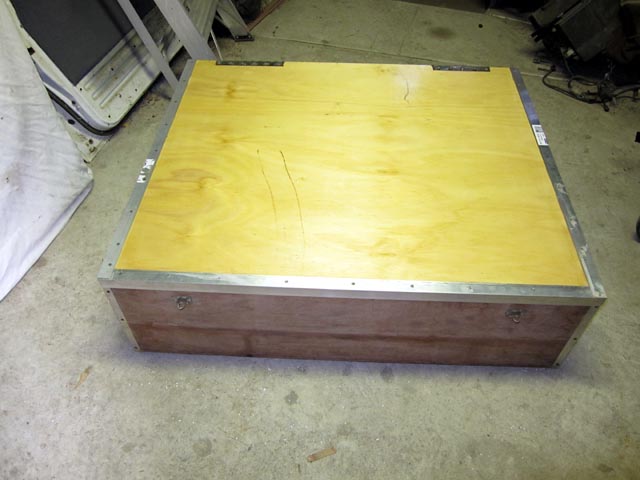
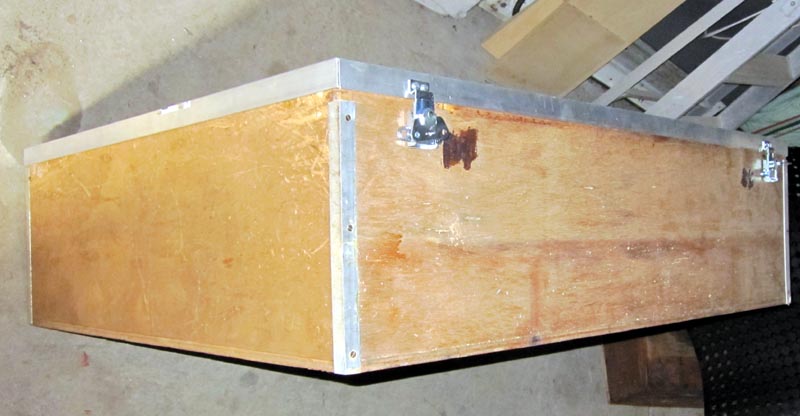
Here's the box with the new lid screwed down (after a few coats of polyurethane) to the large rear hinges and with the new aluminium angle installed. I haven't installed the clasps yet since I was planning to find some nice ones here in the US, which I did a few weeks back. So, next trip to oz will have me installing them.
This is one of the clasps that I sourced in the US. It is made by Southco and is of great quality. The butterfly rotates to extend (to open) or retract (to lock) the clasp. The small section on the left will be screwed into the lid, through the aluminium angle and into the plywood.
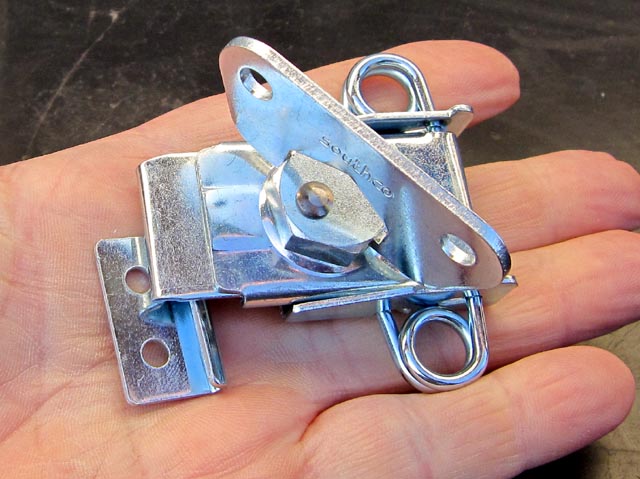
Here's the clasp retracted. The butterfly can then fold down to the right so it isn't sticking out.
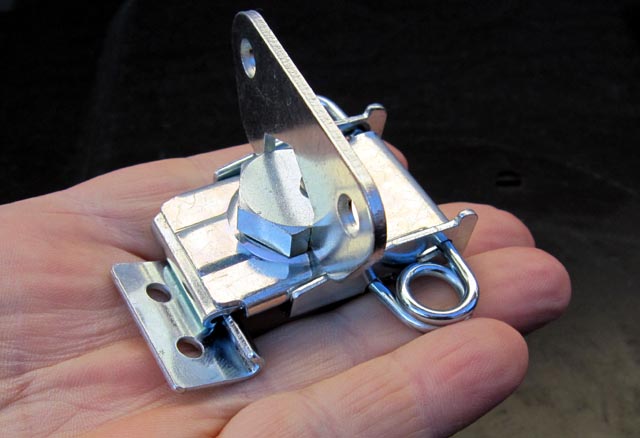
This is the clasp section folded away to release itself from the lid. Three bolts will go through the holes and through the side of the box to securely mount it. The spring that you see is to provide a few millimetres of 'clamping' play. i.e. the hinged part of the clasp can move a few millimetres in the provided slots. That way there is always tension keeping the lid closed down, nice feature.
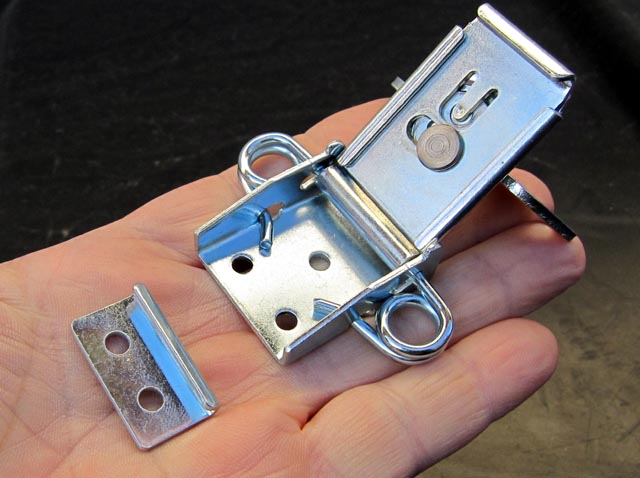
So, 2012 trip and the clasps are now installed on the food box. They worked fantasically on our 2 week trip, MUCH easier to use and kept the lid securely closed and sealed.
During the 2011 trip the folding kitchen table was showing signs of falling to pieces as the chipboard was rotting due to rain, age & use. Since I was replacing the food box lid, the old lid with a some cutting of worn out bits was recycled to become the new surface for the table. A few coats of polyurethane and the new table is all done and ready for many more years of camping use. It isn't our original table (long since disintegrated due to wooden legs etc), but one that my parents used years ago.
In the picture below you can see the 'new' table and also the new side of wood (lighter in colour) on the fuel box - to replace the piece that was broken when the jerry can went flying...
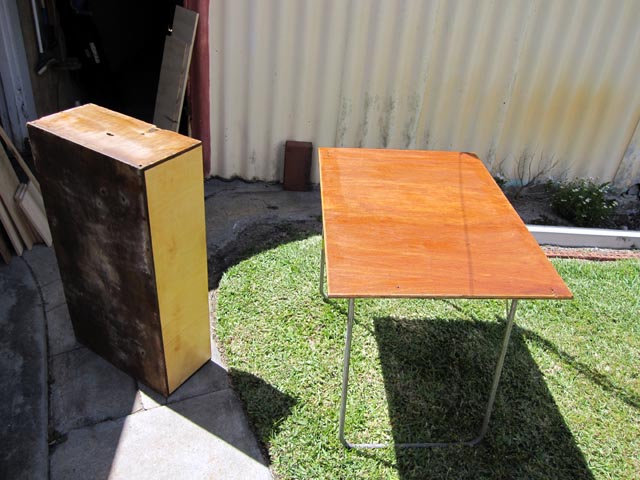
And here's the table in use during our 2012 trip. The table was great and with the polyurethane finish made a great cutting board and was easy to wipe down and clean. Of course it doesn't compare with Rod's super duper aluminium folding/collapsing modern wonder, but then it didn't cost $150+ either ;)
A bunch of small fixes/improvements that will provide many more years of camping service for these items.
Ok, short trip (2 weeks) Sep 2016 gave me an opportunity to do some updates.
One job was installing the new Kenwood mechless head unit. Bluetooth so now I can just play direct from a smartphone etc. Didn't bother even connecting an antenna to it since I never listen to the radio anyway... This is a Kenwood KMR-M308BT Marine unit. I've replaced the input caps with 25V rated and 135C automotive grade caps - no risk of them ever failing like the blaupunkt unit! The board is conformal coated and I added a new layer of silicone conformal coating after replacing the caps. Should hopefully be a very reliable unit for years to come.
Also tossed the GME TX3400 which blew it's power amp stage (bullshit failure for what is meant to be an Oz made for Oz conditions UHF radio). Replaced it with a $25 Baofeng unit with oz UHF CB channels programmed in. 5W handheld so gives the same capabilities as the TX3400 for a fraction of the price. I can connect the Baofeng to the UHF antenna via a cheap adapter so can still get decent range. Of course the Baofeng also has a bunch of the Ham VHF frequencies I have locked into the Yaesu FT7900 so provides a portable solution for Ham use. With the 50W capability and VHF range of the FT7900 as a camp base station I have good coverage in case of been far off on the Honda Z50 from camp and need 'rescuing'.
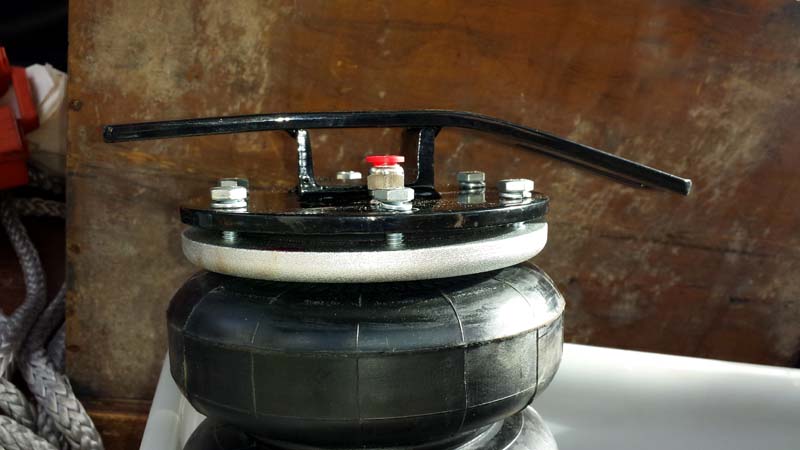
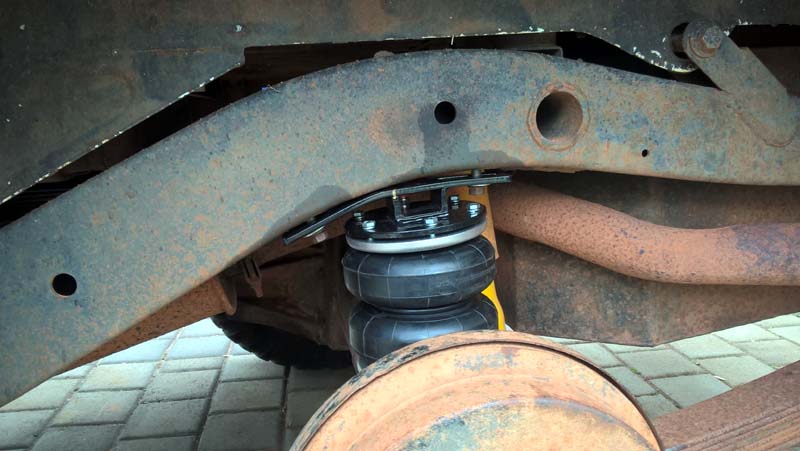
Since the rear end of the Patrol sags when fully loaded (lots of weight when heading out bush for a few weeks) I gave up on adding more and more leaves and instead decided to try airbags. Picked up a set on Ebay from Boss and other than needing to tweak the top bracket to conform to the SWB MQ's chassis they went on nicely. Of course removing the ubolts that have been on for quite a few years required considerable muscle work - but finally they were off and all cleaned up.
Here's one airbag with modified top bracket (top bolts not snugged down yet):
And a bag installed (again, top bolts nut snugged down yet):
A quicky test with just 20psi lifted up the vehicle. Definitely harsh with it lifted and no additional weight. I'll run the bags empty normally (not a problem in the case of these airbags).
Update after 2019 bush trip. The airbags worked fantastically, I couldn't be more pleased with the ride quality and performance. To level the vehicle and raise it to unladen height (with all the camping gear, fuel, extra fuel, water, Honda Z50 etc) required about 25psi. A couple psi more on the left side than the right to level it all out. The left side has a bit more weight due to the food and extra jerry cans being biased to the passenger side). So, big thumbs up for the Boss airbags.
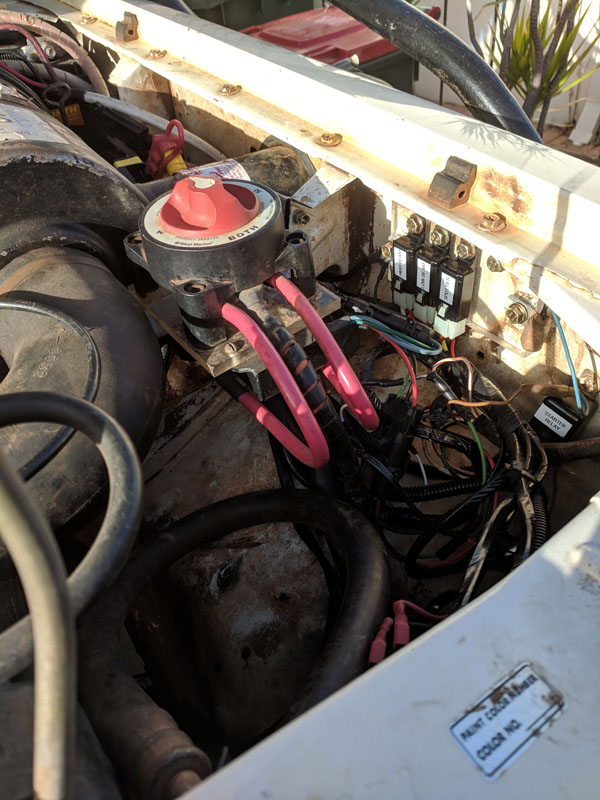
Another job was to finally replace the original points based voltage regulator (external regulator on the MQ's alternator) with a modern electronic one. Found a plug and play unit IH811 by Transpo (about $20) that mates exactly with the MQ's connector. Brilliant! No more voltage variations due to the old points based unit. Solid 14.3V regulated output. Mounting holes lined up exactly too. The IH811 is fully potted so no environmental issues. Picture below shows the IH811 hooked up so I could test and make sure it was working well before mounting it to the fender and throwing the old points based unit away.

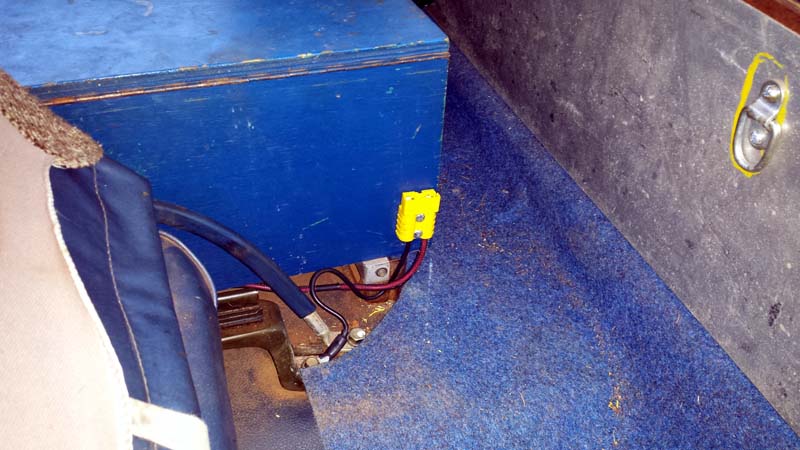
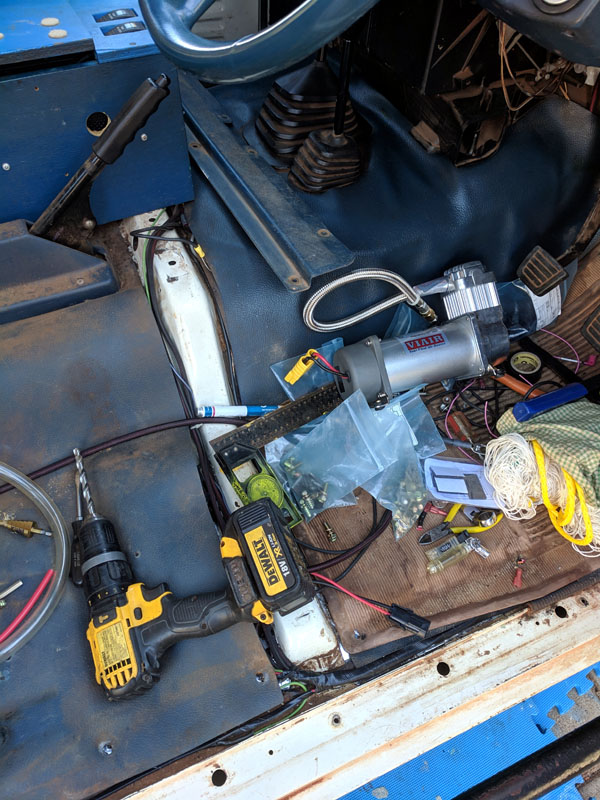
Last trip back I finally (it's taken too long...) got fed up with the daft cigarette lighter plug on the fridge. So this was a good chance to mount an Anderson SB50 near where the ARB fridge fits. Cut the plug off the fridge cord and put a mating SB50 on it. No more risk of the plug coming out now when we're out bush. The positive cable is 10g and is a direct run to the fuse block next to the aux battery. Minimal voltage drop. Ground connection is to the body via a passenger seat mounting bolt. The positive cable is covered in an expanding mesh protective shield.
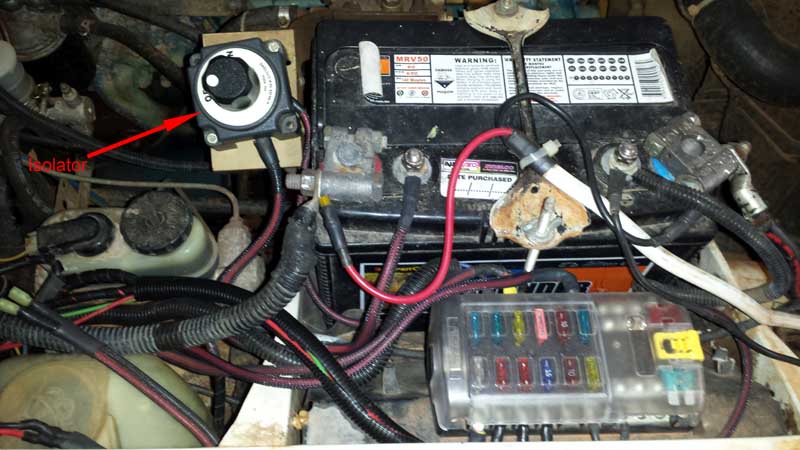
Bluesea marine switch as isolator switch for auxiliary loads.

Ok, another short trip (about 12 days) July 2018 gave me an opportunity to do some more updates.
New trip computer and turbo timer with a touch LCD panel installed. After a few decades the old computer has been superceded, especially the old keypad. My older son did a 3D model of the bezel and I then had it 3d printed at shapeways (less than $10 including delivery).
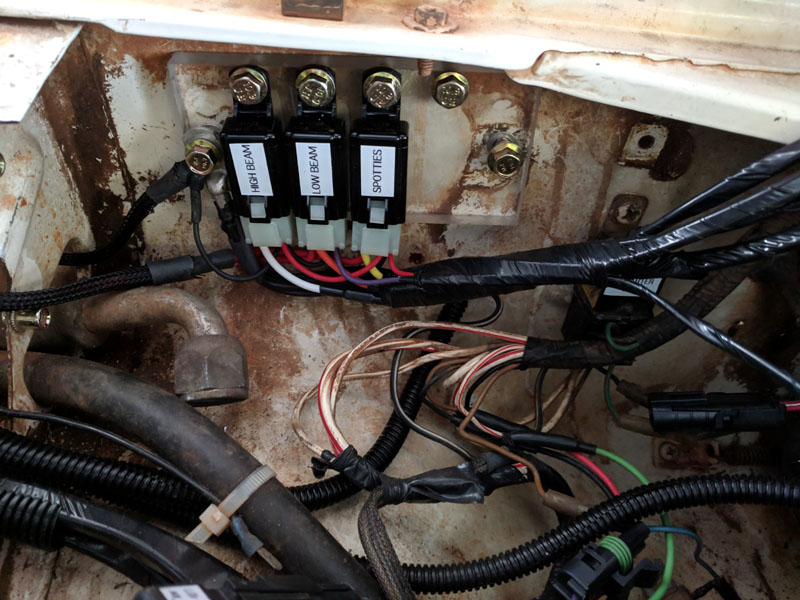
Also ditched the wiring etc to the dead GME UHF unit (junk blew up). Now I can just plug in a baofeng unit with oz UHF channels programmed in and it also can operate 2M and UHF Ham frequencies. Yes, I have an amateur radio license. This is the finished installation. The mike and head are for the Yaesu FT7900R that has been in for quite a few years now.
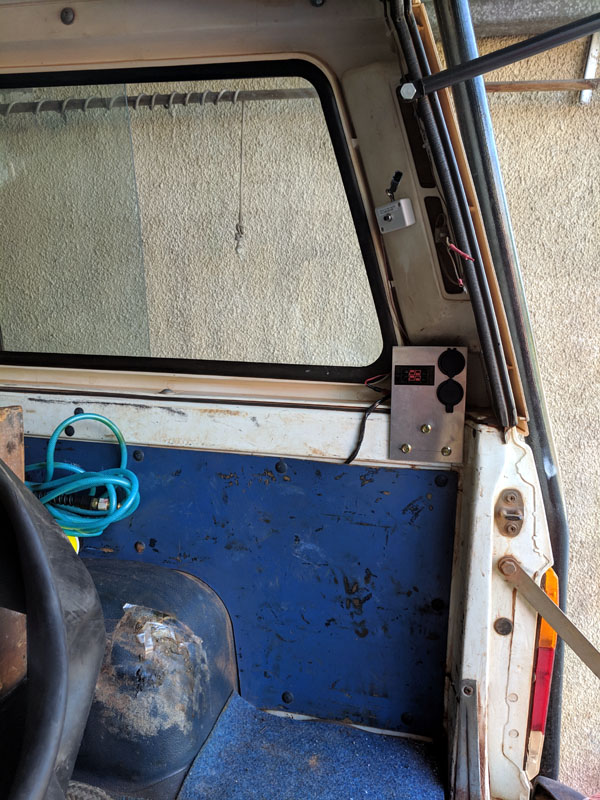
The little unit on the dash in the top/right is a BT interface for the newly installed Victron MPPT 75/15 solar charge controller that is now hardwired into the vehicle. Update after 2019 trip. The Victron performed flawlessly for our trip and being able to monitor voltage and charge at any time via the BT app was magic. Great product.
Another view of the Deutsch bulkhead connector.
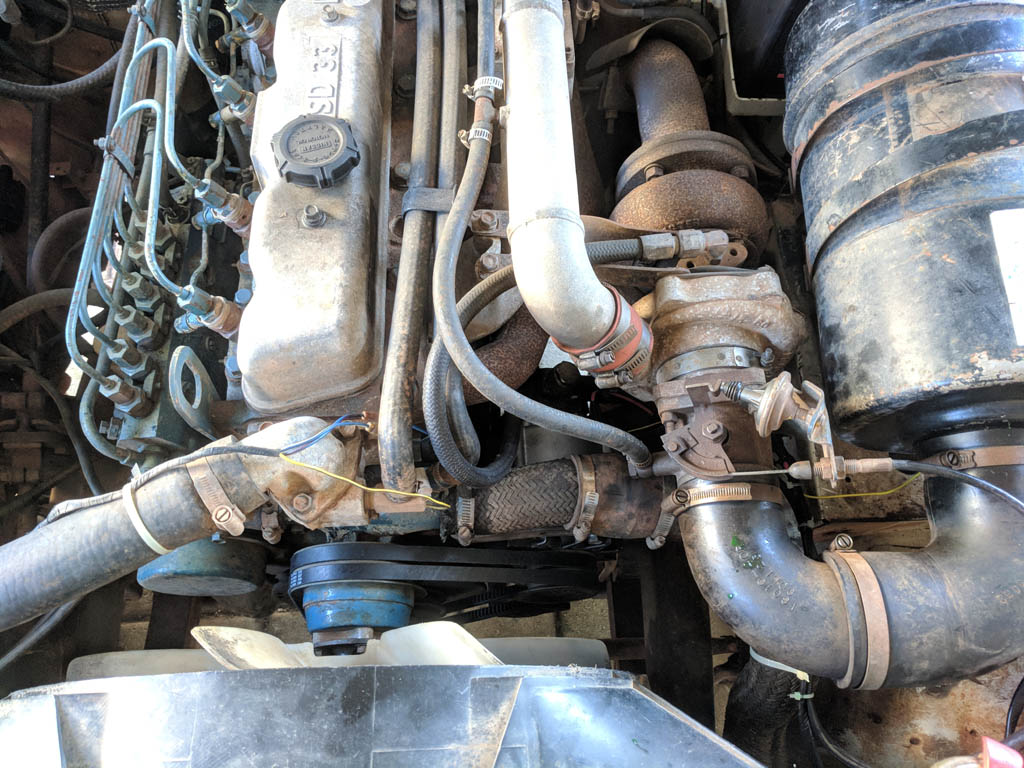
So, given that the vehicle was originally 24V and I had converted it to 12V I had installed the Tacho from the donor vehicle. To make the tacho work I had built a circuit to use a magnetic pickup off the alternator blades and convert the alternator RPM to the correct corresponding frequency for correct display on the Tacho. I've found over the years that the magnetic pickups last a few years and then fail. So, this trip the plan was to modify the alternator to add a 'W' wire to bring out one of the alternator phases (pre-diode). On opening up the old alternator I found the brushes were worn down to stubs and the rear bearing had collapsed - amazing it was still working. Anyhow, rather than trying to repair the old alternator it was cheap enough (about $125) to get a brand new alternator that was intended for the GQ patrol series. This has the vacuum pump on the rear and also the same mounting tabs and dual fan pulley spacing.
Below is a picture of the modified alternator with the 'W' wire connection (I used yellow TXL 18AWG). I also replaced the old alternator output wires with a new pair of 10AWG wires with a brand new black boot. The wire pair connects with a Weatherpack 480 series dual connector (rated at 84A for pin pair). The other end of the connector has a 10AWG pair that is crimped to an 8AWG wire that then terminates at a MIDI fuse that connects to the main Battery + terminal.
The GQ alternator is rated at 80A maximum a welcome upgrade from the MQ stock 55A maximum output.
The GQ alternator also utilises an internal regulator, so I removed the IH811 that I had fitted the previous trip and made the small wiring modifications to the OEM wiring to use the new S/L 2 pin regulator connector. S runs directly to the MIDI fusible link to sense the battery +12V and the L runs to the same place as the stock OEM wiring (WR wire) that runs to the Charge Bulb. The L pin relies on the Charge Bulb resistance to a) illuminate the bulb if the alternator is not operating properly and b) to excite the field winding to 'bootstrap' the alternator.
Sleeving was put over the yellow wire prior to installation into the vehicle to protect from chaffing.
GQ alternator installed into the MQ. A few minor tweaks to a mounting ear and we also removing a small amount of material from the alternator fan spacing bushing to more perfectly align the belts. They are now spot on. Of course we installed a new matched set of belts since the old ones had somewhat stretched over the years.
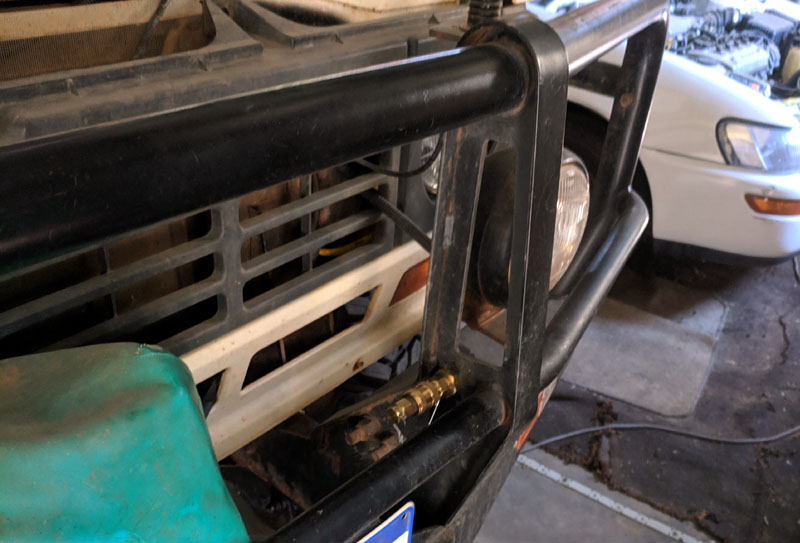
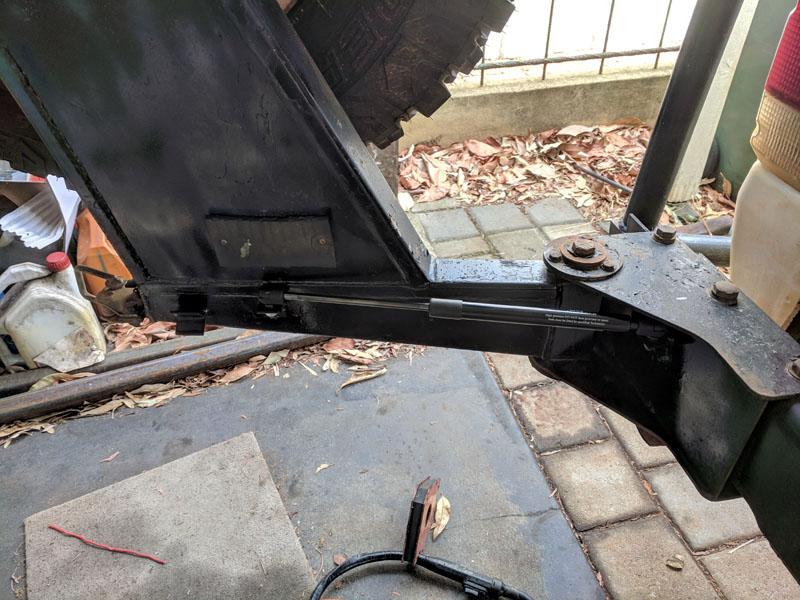
The spare tyre carrier never had a locking mechanism and it has always just swung loosly. So, did some calculations to fit a gas strut and made a couple of right angle brackets that were then migged to the carrier assembly. Cheap ebay struts that came as a pair, so one fitted and one as a spare. The strut now open up the tyre carrier to my chosen widest point, far enough to easily clear the tailgate without being too far out if in the garage etc. Closes easy enough by hand, but with enough resistance to not swing around even if off angle. So nice.
![]()