Washer
bottle relocation instructions
This a link to relocation the washer bottle if
you have a supercharger.
The post '93 80 series TLC has all the
mounting holes necessary for a factory battery tray.
The first step is to relocated the factory
washer bottle to free up space for that tray.
Pre '95 models (from what I've seen) also
have a little airbox contraption on the airfilter inlet that gets
in the way of the auxiliary factory battery tray. That airbox
also needs to be relocated and requires some extra work - an
exercise left to the reader ;-) Some people have just removed the
airbox (essentially a resonator) but if you live in a smog
capital then you run the risk of getting smacked by the smog
police...
To relocate the washer bottle was a
challenge. The first attempt was to use a smaller aftermarket
washer bottle which barely had sufficient pressure to sprinkle
the windshield. Then a search for a location somewhere in the
engine bay for the original washer bottle commenced. Eventually
the spot behind the cruise control module was indentified as a
good place - and pretty well the only place.
I then made up a set of metal brackets to
allow for the easy relocation of the washer bottle to an
accessible area between the rear of the air cleaner assembly, the
rear of the cruise control module and the passenger firewall.
Installation Instructions:
Remove the washer bottle from its stock
position on the fender.
- Unplug the power connector to the
washer bottle motor. There is a small tab that must be
depressed as you pull upwards on the plug.
- Siphon any remaining washer fluid out
of the bottle (optional).
- Remove the three bolts that fasten the
washer bottle to the fender, these can be reused to
fasten the auxiliary battery tray.
- Unplug the hose that runs from the
motor/pump on the lower part of the washer bottle. This
hose carries the washer fluid to the front and rear
windshield nozzles. If you haven’t performed step 2
above, be prepared to plug the hose with you finger.
Drain all fluid from the bottle, this will ease the
installation phase below.
Extend the washer bottle motor cable
- Disconnect battery ground if desired.
(If you have activated the anti-theft feature of your
stereo, ensure you know the code and how to enter it in).
- Remove several inches of the outer
wrapping from the plug end of the cable to expose the two
wires.
- Cut the two wires, one approx 2"
from the plug, the other approx 3" from the plug.
Cutting the two wires in this fashion ensures that the
wires do not get crossed in the process of adding in the
extension cable. Place the plug aside.
- Trim the insulation from one of the
wires back ¼" or so and insert into one of the
provided butt connectors. Crimp the butt connector
securing the wire. Repeat this step on the other wire.
- Take one end of the provided extension
cable and insert one wire into the free end of one of the
butt connectors from step 4, crimp and secure the wire.
Repeat this step on the other wire.
- Take the plug and the other end of the
extension cable and perform steps 4 and 5 again. Insert
the extended cable into the provided slit sleeving.
- Wrap electrical insulation tape around
the connections.
- If you performed step 1, reconnect
battery ground and reprogram clock and stereo as required.
Install relocation brackets and washer
bottle in new position (refer figures 1,2,3)
- Refer to the figure below to identify
each of the brackets and where they will be bolted.
- Remove the two bolts and metal washers
that secure the cruise control module to the US passenger
side fender. Attach brackets #1 and #2 as shown in figure 1 and loosely fasten with the same two bolts
and washers.
- Remove the bolt and washer that
fastens the rear air filter bracket to the fender. Attach
brackets #3 and #4 as shown in figure 2 and loosely fasten with the same bolt and
washer.
- Test fit the washer bottle up against
the brackets and ensure that no part of the vehicle rubs
on the bottle. It may be necessary to bend the small
bracket that retains the brake line on the fender to
ensure clearance between the washer bottle, see figure 3.
- Plug the extended power connector into
the washer bottle motor. If you wish, you may trim the
length of the hose – now that the bottle is closer
to the firewall, otherwise roll up the extra hose length
and secure with a tiewrap. Plug the hose into the washer
bottle motor/pump.
- Attach the washer bottle to the
brackets. Ensure the mechanical cable that runs from the
cruise control module to the fuel system fits between the
washer bottle and bracket #3. Wrap the provided spiral
sleeving onto the cable to prevent it chaffing on the
bracket or bottle. See figure 1.
- Use the two 7mm (13mm heads) bolts and
nylocs on the two upper washer bottle tabs. The 5mm (10mm
head) bolt and nyloc secures bracket #4 to the lower
right washer bottle tab. Ensure you have placed a washer
between the rear of the washer bottle tabs and the nylocs.
You may have to slightly drill out or ream the washer
bottle holes to allow the supplied bolts to smoothly fit
through the holes.
- Tighten all loose bolts. Refill the
washer bottle and test it. Run it a bit to clear out the
air in the hose.
Tools/parts required:
- Ratchet wrench with extension
- 10 mm wrench/socket
- 12 mm wrench/socket
- 13 mm wrench/socket
- Wire cutter/stripper
- Electrical insulation tape
- Crimping tool or pliers
- Solder and soldering iron if you
prefer to not use the butt connectors.
Figure 1. A view of the
relocated washer bottle and three of the support brackets. You
can just see the spiral sleeving that protects the cruise control
cable running between the bottle and the lower right support
bracket.
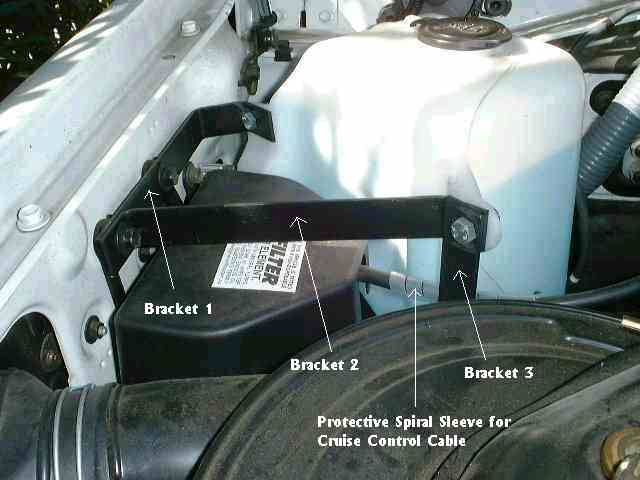
Figure 2.
A view of the relocated washer bottle from the firewall direction.
You can see the 4th support bracket at the bottom left of the
washer bottle. It bolts to the same aircleaner mounting bolt as
the vertical bracket (seen on the upper left of the washer bottle)
and picks up a lower washer bottle mounting tab.
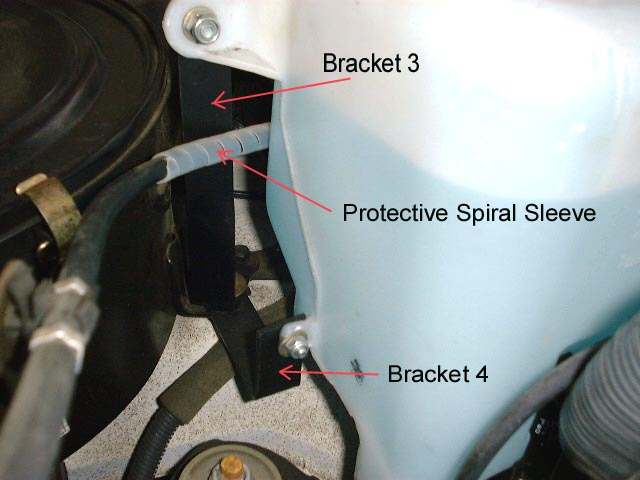
Figure 3.
Right at the bottom of the washer bottle rear, you can just see
some of the coiled brake line. This is the line that may need
slight bending to not rub on the bottom of the washer bottle.
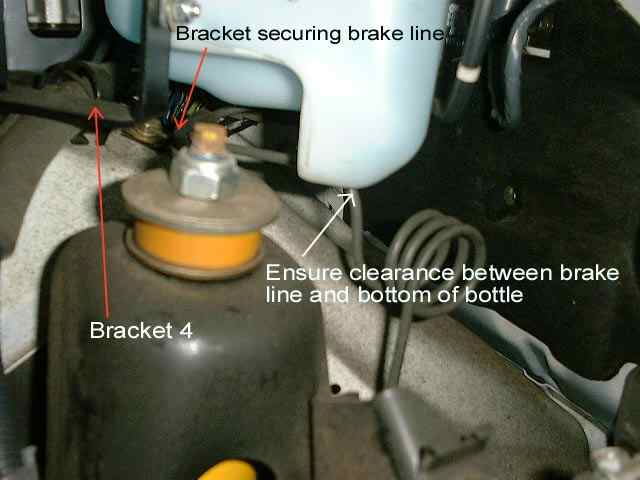
Figure 4. The finished view of
the relocated washer bottle in the background with the auxiliary
battery installed in the factory tray occupying the space that
the washer bottle was originally in.
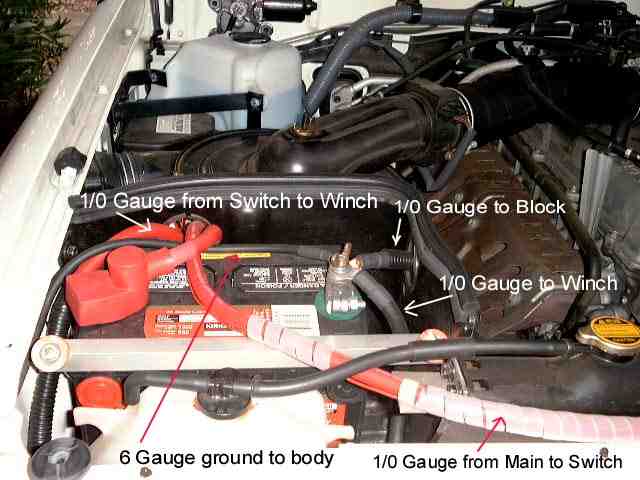
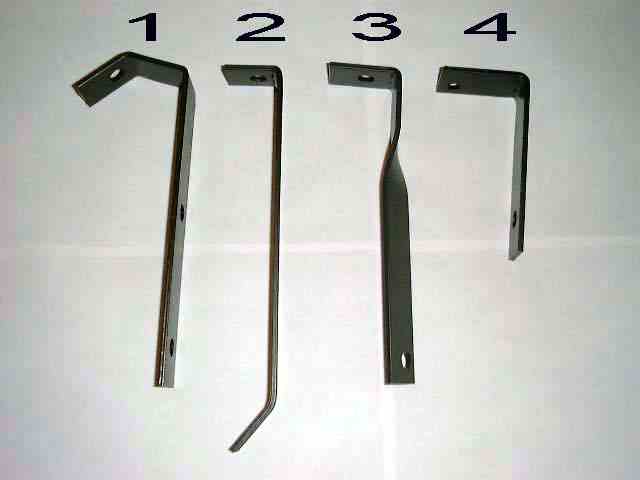
Figure 4. The four brackets
that I made to relocate the washer bottle. Bracket 3 is the
'interesting' one. After making the prototype set, I just cloned
each one when I made up a few new sets. The numbering below matches the
numbers in the other pictures and the text. The brackets are made
from 1" wide 1/8" thick steel.